Top Ad 728x90

Showing posts with label Salty. Show all posts

Sunday, May 7, 2023

Deep Dish Chicago Style Pizza

by


INGREDIENTS


Crust:

1 c. water

1 pkg yeast

1/3 c. corn oil

1 Tbsp sugar

1 tsp cream of tartar

1 lb Bread Flour

Pizza Sauce:

28 oz plum Roma tomatoes (or San Marzano (my favorite) tomatoes – less ¼ c of the sauce before you mush it)

1/2 tsp salt

a pinch of basil

a pinch of oregano

fresh ground black pepper

Toppings:

16 oz. mozzarella about 4 c. Low-moisture part-skim (NOT low fat. It won’t turn out good if you use low fat)

Pepperoni

Italian sausage uncooked pinched into little pieces

DIRECTIONS


Crust:

In a bowl, put water (lukewarm), then yeast, oil, cream of tartar, and sugar. Mix with hand until yeast dissolves.

Pour in bread flour a little at a time. Mix with your hand. Just curve your hand like a dough hook and hold the bowl and mix. Then, knead it until it gets firm. Add more flour if needed.

The secret is kneading. Knead it for about 10 minutes straight. Then, roll it into a ball, and put it in a bowl with oil brushed in the sides. Cover with plastic wrap and a kitchen towel. Let sit overnight unrefrigerated. Only let it rise once. Portion and use.

Pizza Sauce:

Take the tomatoes and sauce and place them into a bowl. Using a potato masher or just your hands, mash the tomatoes up so that there are no chunks bigger around than a quarter.

Add the rest of the ingredients and stir. Adjust the salt and pepper to taste. Do not use too much basil or oregano.

Assembly:

Preheat oven to 350.

Prepare your deep dish pizza pan (or a round cake pan with straight sides) by coating the inside of it with a very healthy coating of melted butter or oil.

Roll the dough out to about 3 inches larger than the bottom of the pan, then place inside the pan and pinch the dough up along the sides.

Now put the cheese in (right on the crust). Then add the pepperoni and sausage pieces, and finally the sauce (Don’t worry, the sausage will cook through completely in the oven).

Bake in the oven until the crust is starting to brown and cheese is starting to bubble up through the sauce. The little edges of the pepperoni should also be starting to crisp and the sausage should be cooked through (about 45 minutes).

Tuesday, May 2, 2023

BEEF ROAST POT

by


Ingredients

  • Little carrots
  • 1 potato
  • 3 tablespoons of creole spice
  • 1 tablespoon black pepper
  • 2 tablespoons of onion powder
  • 1 tablespoon garlic powder
  • 1 tablespoon celery chips
  • 1 tablespoon of parsley
  • 1 cup of water


Instructions

Step 1.

Chop potatoes and carrots


Step 2.

Roasting beef Рseason with ingredients and saut̩ on a skillet over the stove

Step 3.

Placed in a casserole dish

Step 4.

Add a cup of water

Step 5.

Add more Creole spices to taste and cover with tin foil

Step 6.

Bake at 350 degrees for two and a half hours

Step 7.

Remove the tin – add the carrots and potatoes

Step 8.

Put in the oven again and bake uncovered for an additional 30 minutes or as desired

 Enjoy!!

Easy Baked Chicken Thighs

by


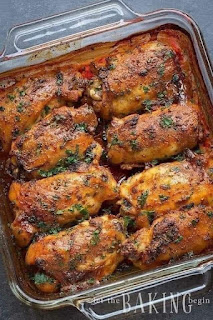
Easy Baked Chicken Thighs

Baked Chicken Thighs are a delectable and straightforward main course. The skin on these chicken thighs is delightfully crispy, and the meat is exceptionally delicious! They’re delicious with mashed potatoes or scalloped potatoes on the side.


Ingredients:

  • 6 bone-in chicken thighs with skin (approx. 5-6 ounces each)
  • 2 tablespoons olive oil
  • 2-3 teaspoons chicken seasoning or Italian seasoning
  • salt and pepper to taste


Instructions:

  1. Preheat the oven to 425 degrees Fahrenheit. Place a baking rack on top of a foil-lined pan.
  2. To eliminate any moisture, pat the chicken skin dry with a paper towel.
  3. Season the chicken with seasoning, salt, and pepper after drizzling it with olive oil.
  4. Bake for 35-40 minutes, or until the chicken reaches 165°F degrees, on the rack.
  5. Broil for 2 to 3 minutes.

Enjoy!!

Monday, June 20, 2022

Chitterlings Recipe

by


Chitterlings Recipe

Chitterlings are a classic southern soul food that belongs on your dinner table! Here's how to clean and prepare a delicious spicy chitterlings recipe


Ingredients:

  • 5 pounds frozen chitterlings
  • 1 pound hog maws
  • 1 small Onion, roughly chopped
  • 1 teaspoon salt
  • 1 teaspoon white vinegar
  • 1 teaspoon minced garlic
  • 1/2 teaspoon red pepper flakes


Cookware and Utensils:

  • 1 6 quart boil pot
  • 1 cutting board
  • 1 sharp knife

Instructions:

As always the key to great cooking is preparation and quality ingredients.

Most people are too intimated to try to cook chitterling on their own. But with the instructions that follow on how to cook chitterlings you’ll be okay.Where to find Chitlins & Hog Maws


  1. You can find chitterlings and hog maws at your local grocery store. They are usually found with the frozen foods and come in 5 or 10 pound buckets or plastic. It will take several hours to thaw out your frozen chitlins. The hog maws come in packages and are also usually frozen. The hog maws are very tough, so it’s a good idea to cook them while you’re cleaning your chitlins.
  2. To prepare the hog maws for cooking rinse them in water and trim away excessive fat. Place your hog maws into a 6 quart cooking pot. Fill the pot with water to the half way point. Bring the water to boil over medium-high heat, reduce heat to medium-low and cook for 1 hour. Don’t let the water cook out, add additionally water if necessary. When the meat is fully cooked, using a cutting board cut your hog maws into 2 inch thick pieces. The chitlins will be added to the hog maws later.


How to Clean and Cook Chitlins

  1. If you want your recipe to turn out right wash your chitlins thoroughly…let me reemphasize, this is very important. Once your chitlins have thawed it’s time for a good cleaning. Using one side of your sink, soak your chitlins in cold water. Examine each chitlins thoroughly removing by hand all foreign matter. The best way to do this is under running water.
  2. Under running water you need to repeatedly pick clean each chitlin. While picking clean the chitlins you should remove extra fat and any specks that you see.
  3. A good technique is to work out of both sides of your sink. Soak your chitlins in one side and clean and rinse in the other side of your sink. Once you have cleaned a chitlin place it in the container that it came out of.
  4. After all chitlins are cleaned they must be run through several changes of cold water. Just fill your sink with enough water to cover the chitlins. The chitlins should be washed until the water is nearly clear when they are removed.
  5. Now that wasn’t so hard was it? Okay now that the chitlins are cleaned and the hog maws have cooked a little. It’s time to finish up this tasty recipe.
  6. Place your chitlins into the pot with the hog maws and fill with water. Bring to full boil, and then add chopped onion, salt, red pepper and vinegar. Reduce heat and simmer for 3-5 hours until meat is tender to your liking. Add more water if necessary.
  7. Once the chitlins and hog maws have tendered remove from heat. Using a cutting board and knife, cut the chitlins and hog maws into 1 inch thick pieces. Serve on a bed of rice or with spaghetti.

ENJOY!!

Cheesy Shrimp Tortellini Alfredo Skillet

by


Cheesy Shrimp Tortellini Alfredo Skillet


If you love tortellini alfredo, wait until you get a bite of this! You can get my favorite recipe for Cheesy Shrimp Tortellini Alfredo Skillet Recipe. Creamy sauce, tasty tortellini, and tender shrimp, I don't think it gets better than this.

  • Prep Time: 15 MINUTES 
  • Cook Time: 5 MINUTES 
  • Total Time: 20 MINUTES

INGREDIENTS

  • 1 lb. Cheese Tortellini
  • 1 lb. Jumbo Shrimp, cleaned and deveined
  • 2 tbsp. Butte
    • 1 Plum Tomato, diced
    • 1 tbsp. Fresh Basil, chopped
    • 2 Cloves Garlic, minced
    • 2 tsp. Prepared Horseradish
    • 1 tbsp. All Purpose Flour
    • 1/2 c. Heavy Cream
    • 1/4 c. Grated Pecorino Romano Cheese
    • Kosher Salt, to taste
    • Fresh Ground Black Pepper, to taste

    INSTRUCTIONS

    1. Cook the tortellini according to package directions; drain.
    2. Add the butter to a large skillet and cook the shrimp until almost cooked through; approximately 2-3 minutes.
    3. Add the tomato, basil, garlic and horseradish and cook for another 1-2 minutes until the shrimp is cooked through and is white/pink and not clear.
    4. Stir in the flour; then add the heavy cream and cheese. Mix well; then add the cooked tortellini and stir until all coated.
    5. Sprinkle with extra cheese and chopped basil for garnish.

    ENJOY!!


Smoked Turkey Greens

by


Looks great and crispy delicious, and healthy !! This dish took me back to my childhood.

WHAT YOU WILL NEED:

  • 1 bunch of green cabbage
  • 1 tbs olive oil
  • 1/2 onion, diced
  • 3 garlic cloves, diced
  • 3 cups chicken broth
  • A tbs of red pepper flakes
  • 1 smoked turkey, fully cooked (smoked turkey wings can also be used)
  • Condiments (optional) (salt, pepper, vinegar, hot sauce.)

HOW TO MAKE IT:

Step 1:

remove the green cabbage leaf from the steam.

Step 2:

wash the cabbage well in cold water to remove any dirt and particles. We can also use salt to help remove particles if needed.

Step 3:

rinse it well and set it aside.

Step 4:

In a large saucepan over medium heat, add 1 tablespoon of olive oil, chopped onions, and garlic. Fry until soft.
Then we add the chicken broth, red pepper flakes and turkey shake. Bring it to a boil, then reduce the heat.

Step 5:

leave it for 20-30 minutes. This helps the broth gain that delicious smoky flavor!
Then we add green cabbage.

Step 6:

Cover over low heat for 45-60 minutes, or until desired softness is reached. Do not boil the cabbage. It will wilt when cooked.
When you’re done, season to your preference

Sunday, June 12, 2022

Honey Teriyaki Ribs

by


Ingredients:

For the smoker


3 large handfuls cherry wood chips

For the five-spice rub

 3 tablespoons packed dark brown sugar
1 1/2 tablespoons kosher salt
2 teaspoons five spice powder

For the honey teriyaki ribs

Three (2 1/2-to 3-pound) racks meaty baby back ribs

For the honey teriyaki glaze

1 tablespoon toasted sesame oil
3 tablespoons peeled, finely chopped fresh ginger
3 garlic cloves, finely chopped
1 tablespoon sesame seeds
2/3 cup honey
1/3 cup reduced-sodium soy sauce (or tamari for gluten-free)
 2 tablespoons seasoned rice vinegar
1 tablespoon chili-garlic sauce, such as store-bought or homemade Sriracha
1 tablespoon cornstarch dissolved in 3 tablespoons cold waterctions:


Instructions :

Soak the chips for the smoker

Fill a medium bowl with water and toss in the wood chips. Let soak for 30 minutes.

Make the five-spice rub

In a small bowl combine all the ingredients.

Prep the ribs

Remove the membrane from the racks by using a dull knife and sliding the tip under the membrane that covers the back of each rib rack. Holding a paper towel in your hand, grip the membrane at one end of the slab of ribs and tug. It usually pulls right off.

Season the racks with about 1 1/2 tablespoons rub per rack, being sure to put more of it on the meaty side of each rack and less on the bone side.

Make the honey teriyaki glaze

In a skillet over medium heat, warm the oil. Add the ginger, garlic, and sesame seeds and cook, stirring often, until fragrant and softened, 2 to 3 minutes.

Add the honey, soy sauce, vinegar, and chili-garlic sauce, bring to a simmer, and cook, stirring occasionally, for 2 minutes.

Increase the heat to medium-high and bring the mixture to a boil.

Stir the cornstarch mixture to recombine. Slowly stir the cornstarch mixture into the skillet while whisking constantly. Boil until thickened, still whisking, about 1 minute. Remove from the heat.

Grill the ribs

Before lighting the grill, drain the wood chips and add them to the smoker box. (If you don’t have a built-in smoker box, set the box you are using under the cooking grate directly over a burner off to one side of the grill. If it won’t fit, place it on top of the cooking grate off to one side over the burner.)

Prepare the grill for indirect cooking on high heat (450° to 550°F | 232° to 288°C).

When smoke appears, lower the temperature to low (275° to 300°F | 135° to 149°C). Place the rib racks, bone side down, on the cooking grates over indirect heat.

 TESTER TIP: To avoid charred ribs, keep the racks over indirect heat the entire time. Don’t be tempted to hurry things by sneaking them to the direct side. You’ll thank us later.


Close the lid and cook, keeping the temperature 275° to 300°F (135° to 149°C), until tender, about 2 1/2 hours.

During the last 20 to 25 minutes of grilling, generously baste the racks with the reserved glaze every 5 to 10 minutes.

Remove the racks from the grill and let rest for 5 to 10 minutes. Slice the racks between the bones. Pile the individual ribs on a platter and pass the remaining glaze on the side.


Top Ad 728x90